The following must be set in LINKSOFT
to enable the TMS:
-
Tax Label
-
Cashier and Customer "Tax
Identification Number".
-
Enable TMS Integration
-
Setup ESDC or VSDC. Refer to
the setup steps under "ESDC Setup" or "VSDC Setup".
Printing TMS Invoices - LinkSOFT supports
80mm and A4 printing for TMS documents. Note the following:
-
Setup printers. Follow instructions at
this
link
-
TMS printing routine uses Windows Printer
Drivers
-
There is no specific printing settings required for
TMS
Tax Setup
-
Each tax type has a predefined tax
label issued by TaxCore. Refer to Figure 1. This must be created
under "Linkweb - Inventory - Tax Maintenance".
-
Assign the tax code to the
products under "Linkweb - Inventory - Product
Master"
Cashier and Customer TIN
-
Cashier and Customer (Buyer) TIN
must be stored in LinkSOFT. The TIN is transmitted to TaxCore and printed in
the FISCAL invoice.
-
Cashier TIN is saved under
"Linkweb - Point of Sale - User Options"
-
Customer TIN is save under
"Linkweb - Point of Sale - Customer Maintenance"
Enable TMS
SDC integration. This is required for both ESDC and VSDC options.
-
Log into Linkweb and navigate to
"Integration - Integration Setup"
-
Search for "FRCSSDC". This will
load the integration setup for TMS. Refer to Figure 2.
-
Click on the "Pencil Icon".
This will open the "Edit Form".
-
Tick "Active"
-
Save. Click on the "Floppy
Disk Icon".
-
Click on the "Grey Arrow" to
expand into the details.
-
Minimum Product Quantity - This is the
minimum quantity that can processed under TMS. Sale will be prevented when
the quantity is less than this value. Default value is 0.001
-
Allowed Tax Labels - These are the tax labels
that is transited through TMS to identify the tax component. For example,
the label for VAT is "A". Users can add labels authorized by Tax
Core to the list separated by a comma (CSV).
ESDC Setup
-
Install the SoftESDC or Inspur
Device.
-
Plug in the "Smart Card".
-
Navigate to "Linkweb - Point
of Sale - Station Base Setup. Refer to Figure 3.
- Search for ESDC
-
Click on the "Pencil Icon" to
update ESDC Configurations.
-
Tax Integration ESDC API URL
- Enter the API URL in the "Flag Value"section.
-
For Example, http://192.168.0.107:8180. "192.168.0.107" is
the IP of the machine on which SoftESDC is installed or the
IP of the Inspur of the device. "8180" is the port number.
-
Tax Integration Enabled
- Enable ESDC integration, set the flag to
"Yes".
-
Tax Integration ESDC Secure Card
PIN
- Enter the "PIN"number of the smart card.
-
This is a 4 digit number
provided by Taxcore.
VSDC Setup
VSDC is where the document is signed by the internet
using certificates. VSDC setup requires the installation of three
certificates:
-
-
- PFX Certificate or Smart Card Certificate. Refer to 1
and 2 below.
1. PFX Certificate (File based certifcate that does not require any
physical
hardware)
- If you have chosen to use a "File Based
Certificate" (PFX Certificate), use
this
link
to install your certificate. Once your file certificate is installed,
go to step 3.
- Request for the "PFX Certificate" under
"Location - Additional Certificates" to choose the VSDC -
File-based certificate on the "TaxCore Web Portal".
- Install the certificate provided by TaxCore (Installing Dev-Pfx Certificate.pdf)
- Enter the VSDC details into the POS "Station
Configuration" including the "PAC" code provided by TaxCore. This code
should be in the email received from Tax Core.
- Tax Integration VSDC API URL - Enter the API URL in the "Flag Value"section.
- For test or staging setup use - https://vsdc.staging.vms.frcs.org.fj (This is different for each country. Refer to country specific documentation)
- For live or productions setup use - https://vsdc.vms.frcs.org.fj(This is different for each country. Refer to country specific documentation)
- Tax Integration VSDC Certificate
Serial Number - Enter the serial number issued with the digital certificate
for the company.
- Go to Personal Folder and into Certificates.
- Double click and open the certificate for VSDC.
- Go to the "Details" tab
- Copy the Serial Number into a "Notepad"
- Remove all "Spaces" from the number.
- Copy the Serial Number into the Configuration
without spaces.
- Save. Click on the "Floppy Icon".
- Tax Integration Enabled - Enable VSDC integration,
set the flag to "Yes".
- Tax Integration PAC Code - The PAC Code is issued by the
provider with the "PFX Certificate".
- Save. Users should be able to sign Invoices using
VSDC without the need for a PIN or a Secure Card/Secure Card Reader.
- When using the Web Scheduler, the application Pool Identity
should be set to startup using
the user account where the PFX file is setup
- When using the Link Scheduled Service , setup the service account with the user where the
certificate is installed
2. Secure Smart Card
Setup (Requires a smart card reader)
-
If you have chosen to use the secure smart
card then install then PKI Certificate Authority
(CA) certificates on each client machine. Perform
this step only if you are not using a "File Based Certificate (PFX)"
explained in 1. above.
- Install the “Staging” certificates for
development or test environments.
-
-
-
Install the “Production Certificates” for production
setup.
-
-
-
Follow the instructions at this
link
to install the certificates.
-
Navigate to "Linkweb - Point of Sale -
Station Base Setup". Refer to Figure 4. Search for
VSDC
-
Click on the "Pencil Icon" to update VSDC
Configurations.
-
Tax Integration VSDC API URL - Enter the API URL
in the "Flag Value"section.
- For test or staging setup use - https://vsdc.staging.vms.frcs.org.fj (This is different for each country. Refer to country specific documentation)
- For live or productions setup use - https://vsdc.vms.frcs.org.fj (This is different for each country. Refer to country specific documentation)
-
Tax Integration VSDC Certificate Serial Number - Enter the serial number issued with the
digital certificate for the company.
- Go to Personal Folder and into Certificates.
- Double click and open the certificate for VSDC.
- Go to the "Details" tab
- Copy the Serial Number into a "Notepad" 3
- Remove all "Spaces" from the number.
- Copy the Serial Number into the Configuration
without spaces.
- Save. Click on the "Floppy Icon".
- Tax Integration Enabled
- Enable VSDC integration, set the flag to "Yes".
Processing Sales
-
Log into Link POS and "Start Point of Sales".
-
Load the items and complete the transaction. This
will process SDC. Refer to Figure 5.
-
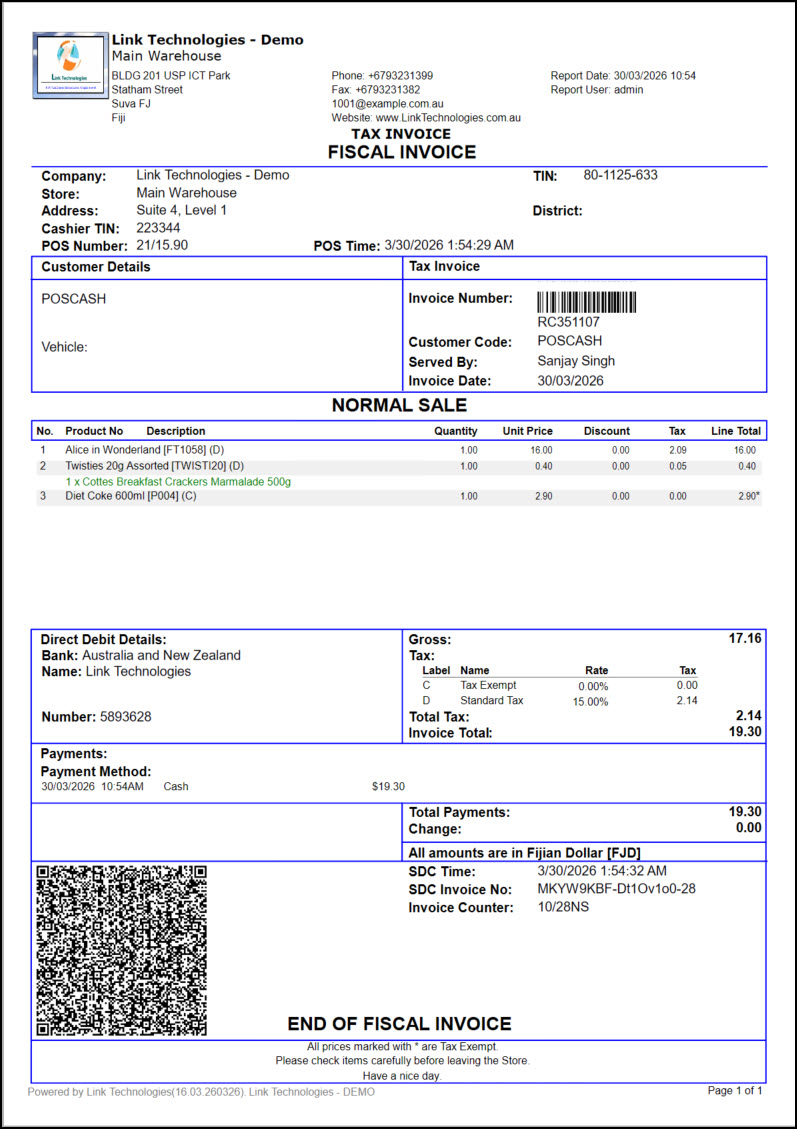
A fiscal invoice will print when the sales data
has been transmitted.Refer to Figure 6.
-
If SDC fails, users can "Retry" after a few
second. Users will not be able to process the second sale if the current
invoice is not signed.
-
If the transaction fails at "Retry".
-
Click on the "Exit and Log Off" button. This
will close POS.
-
Navigate to "Business Intelligence - Data View"
and load the view for "Transactions Pending TMS Signature". This is show
the pending transaction with the details to review and correction.
-
Enable access for "Transactions Pending TMS
Signature" view under Role Menu Access.
-
Following transactions are signed with TMS: Both B2B
and B2C transactions are included.
-
Cash Sales
-
Credit Sales
-
Returns
-
Reprint
-
Quotations
-
Full Lay -by
Figure 1 : TMS Tax
Labels
 Figure 2: Enable FRCSSDC

Figure 3: ESDC
Configuration

Figure 4: VSDC Configuration

Figure 5: SDC Processing

Figure 6:
Sample Fiscal Invoice on 80mm Paper

Figure 7:
Sample Fiscal Invoice on A4